
Learn how to install, deploy, and use PrintVisor. Follow the three steps below to get started quickly.
- Quick start
- How to add PCs to your Company Profile
- How to use PrintVisor
- FAQ
- Why is creating a Company Profile necessary?
- What is the Admin Panel?
- Why link other computers to my Company Profile?
- Who can monitor all printers in a company?
- How to let only the administrator have access to the program?
- How to unlink a computer from the Company Profile?
- Why is data collected via the Internet but not locally?
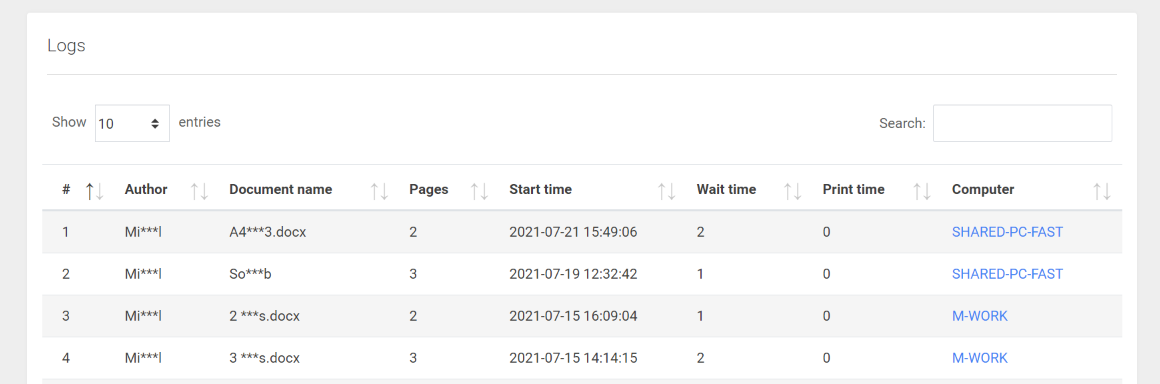
- Why the document names and user names are hidden with ***?
- How do I unhide the *** symbols to see what files were printed by users?
- How to install or update PrintVisor on all computers in the office easily?
- How can I install the program silently?
- Can I find out exactly who printed this or that document?
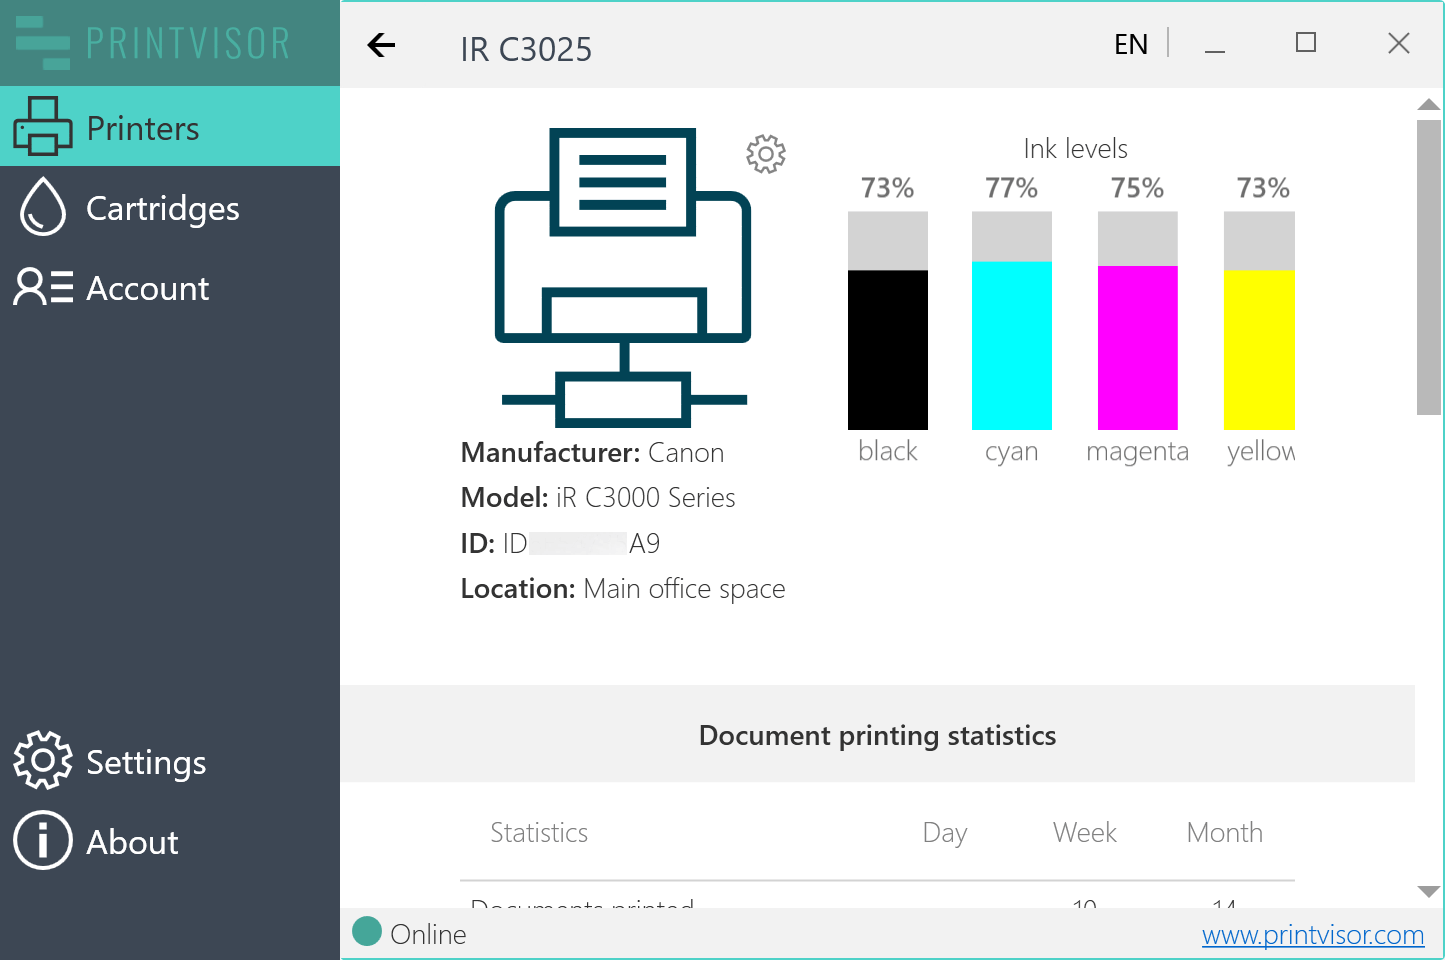
- How to get detailed information on each printer?
- How often does PrintVisor collect data from printers?
- What does printer load control exactly mean?
- What are the possible risks if printers are not monitored?
Quick start

1. Download & install PrintVisor on your PC
Visit the download page to get the latest version of PrintVisor.

2. Create a new Company Profile
At the first launch, PrintVisor will prompt you to create a Company Profile in order to collect and display centralized data in the Admin Panel. To do it, open PrintVisor and switch to the Profile tab. Then, click the Create new profile button or the Link this PC to existing profile button and follow the procedure.
- If you are the PrintVisor administrator (the person who monitors printers in the organization), use the Create new profile button (no matter whether you registered before or not). The program will check the entered email and associate your PC with the previously created or newly created Profile automatically.
- If you are not the PrintVisor administrator, use the Link this PC to existing profile button. Then, enter the Company ID number (you can get it from the PrintVisor administrator), and follow further on-screen instructions.

3. Install PrintVisor on other PCs & add them to the Company Profile
To monitor all the printers within the organization, you’ll need to add all computers that have connected printers (including PCs with access to network printers). This will allow PrintVisor to collect print-related data in the entire organization. See the instructions below on how to add more PCs to your Profile.
How to add PCs to your Company Profile
There are 3 ways to link other PCs with printers to the Company Profile.
- From the PrintVisor app. On a PC which you want to link, open PrintVisor → Profile tab → click the Link this PC to existing profile button and follow on-screen instructions.
Using a .PVZ file. Download a small file called PVZ activation file and run it on all other computers where you want to enable printer monitoring. To get the PVZ file, open Admin Panel → Settings → Get activation file.
 Watch short tutorial video: How to link other PCs to your Company Account
- Remotely from the command line. Install PrintVisor and link computers remotely (silent deployment via command line):
To install and run the program in the background mode:
printvisor.exe -client -profile C12345678RO1234
To install and run the program in normal mode (not in the background) and open the interface:
printvisor.exe -quiet -profile C12345678RO1234
To install the program in normal mode (not in the background) and run in it system tray only:
printvisor.exe -quiet -nogui -profile C12345678RO1234
![]() Congratulations! You have installed and set up PrintVisor in your company environment. The administrator can now watch what is printed by all users, how much resources it takes, and when is the right time to buy new supplies.
Congratulations! You have installed and set up PrintVisor in your company environment. The administrator can now watch what is printed by all users, how much resources it takes, and when is the right time to buy new supplies.
After linking users to your Company Profile, you can:
- Switch the program to the background mode (for users that don’t need to have access to the interface).
- Explore the Admin Panel and get information about printers, computers, and more.
- Set up notifications from PrintVisor about all the important events in the Admin Panel. You can get real-time notifications via Email, Slack, or Telegram.
- Perform silent updates without distracting the employees.
How to use PrintVisor
To use the software most effectively, learn what you can do in the interface and the Admin Panel.
FAQ
Why is creating a Company Profile necessary?
You create the company profile only once to unite all printers via the Company Profile ID. Once the account is created and other PCs are linked to it, all data will be collected and tracked remotely by PrintVisor. If you haven’t created a company profile yet, go to the Profile tab, and click the Create new profile button.
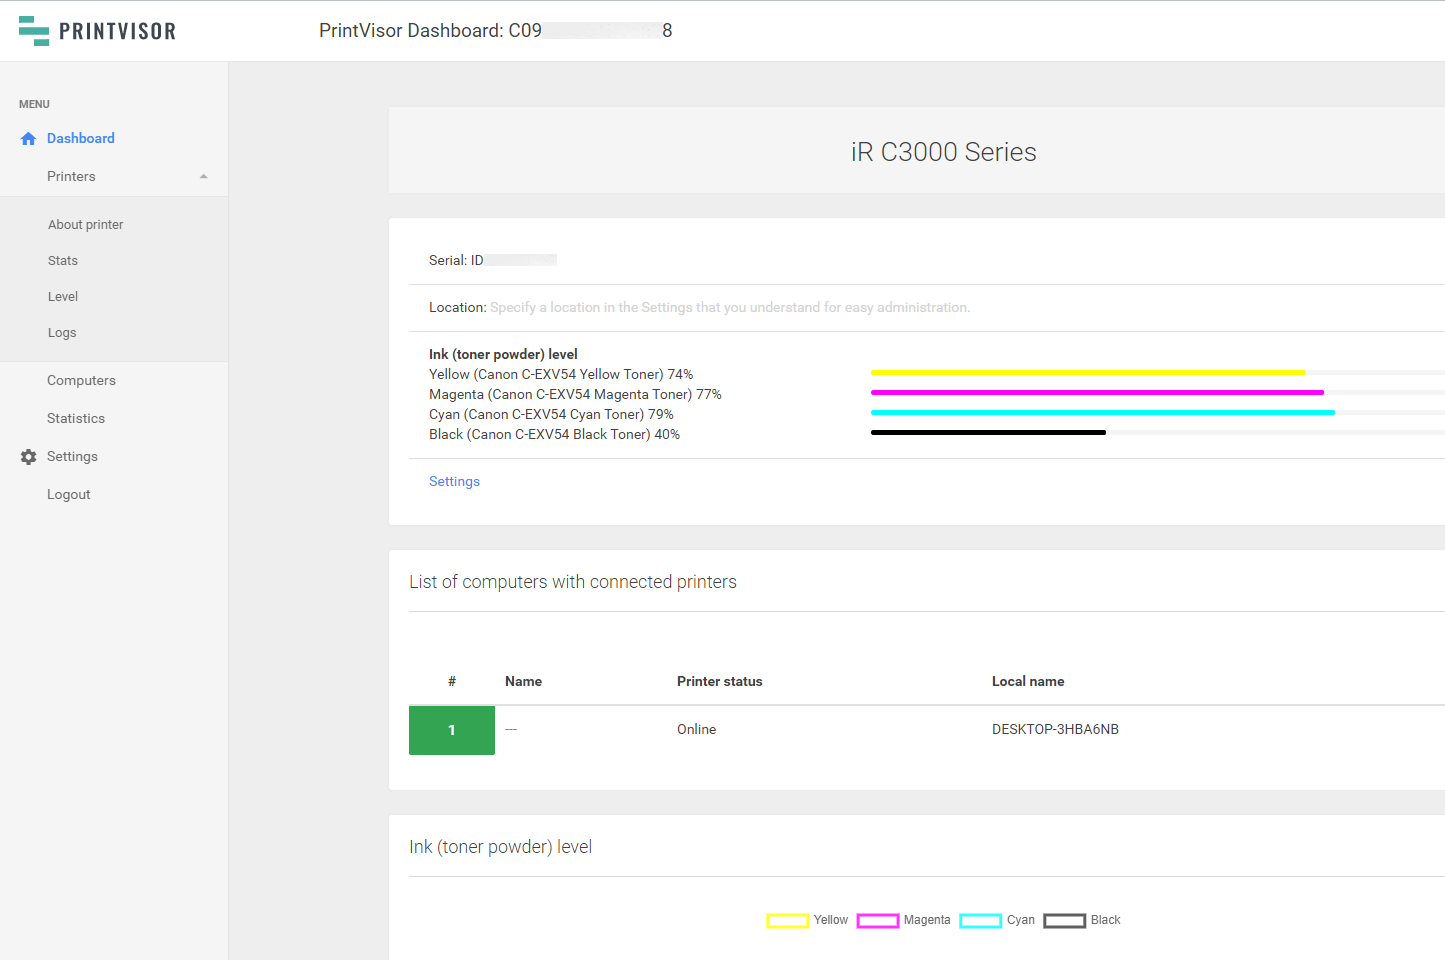
The Admin Panel is a web dashboard where you can find more summary data on printers, computers, printer statistics, and print activity. Here you’ll see various data on PCs, printers connected to them, users and files which they print, ink levels, logs, and stats.
Why link other computers to my Company Profile?
If you install PrintVisor only on one PC, you’ll be able to get data from printers connected to this PC only. But the true strength of PrintVisor is the ability to monitor many printers connected to multiple PCs in real-time.
Who can monitor all printers in a company?
With the login (email or Company Profile ID), the PrintVisor administrator can have personal access or grant access to other employees (for example, an office manager). Other employees who do not have access will see the program in the background mode, only as an icon in the Windows tray.
How to let only the administrator have access to the program?
Those who don’t need to watch printers and print statistics should use the program in the background mode. You switch it on either in the Admin Panel or by clicking the Switch to background mode in the Account tab of the interface. In this mode, the standard interface is not available. The program will work in the background (system tray). You will need the administrator’s approval if you want to switch back to the “normal” mode.<
How to unlink a computer from the Company Profile?
To remove a computer that is already linked to your Company Profile, follow these steps:
- Go to the Admin Panel, then select Computers;
- Click on the gear icon next to the name of the computer you want to remove;
- Select Delete.

Why is data collected via the Internet but not locally?
The easiest way of getting data from multiple computers and printers is by collecting it on a web server. That’s why we designed a web dashboard where you can see printers’ real-time statuses and other print-related data, even from your smartphone. If you need a solution that works locally without Internet access, please contact us and describe your request.
How do I unhide the *** symbols to see what files were printed by users?
It is possible to remove the asterisks by request. If you want to see all file names and it does not violate GDPR regulations or another law in your country that is related to personal data, we can switch off the asterisk symbols and display the full document names. Please contact us, and we may offer you a custom solution if that’s an issue.
How to install or update PrintVisor on all computers in the office?
The program can be installed manually or automatically via the command line. In addition, auto-updates can be easily switched on in the Admin Panel to avoid distracting the employees.
How can I install the program silently?
You can remotely install PrintVisor on multiple PCs from the command line.
Can I find out exactly who printed this or that document?
With PrintVisor, you can find out the computer from which a specific file was printed and when it was done. You can view Recently printed documents in the printer’s profile (double-click the printer’s name in the PrintVisor application) and in the Admin Panel as well.
How to get detailed information on each printer?
Real-time printer status and additional information on each connected device are located on the Printers tab. You can double-click each printer to see its statistics in detail.
How often does PrintVisor collect data from printers?
PrintVisor communicates with printers to get data from them:
- Every 10 seconds, when the interface’s Printers tab is open.
- Every hour, when PrintVisor is in Background mode or the interface window is minimized.
What does printer load control exactly mean?
Usually, the fastest or the closest printer is selected for printing; this is convenient. However, in a large office, this can lead to losses of time. With large print queues, an employee can wait a long time until their document is printed out. Therefore, it is a good idea to evenly distribute the print load on all office printers according to their capabilities. Using PrintVisor, you’ll see which printers are heavily loaded in the Printers tab and the Admin Panel.
What are the possible risks if printers are not monitored?
Ink or toner supplies may run out at an unexpected time, or prints will fade. If you have many printing devices, keeping track of their supplies is necessary – and PrintVisor can help with it. Printer monitoring not only can optimize consumption and reduce costs but also helps to maintain a smooth workflow in a modern office.